


User manual
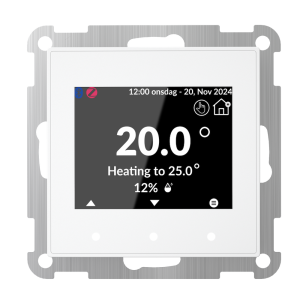
Simplify Thermostat
Namron Simplify Thermostat is part of the new Simplify series – designed with a focus on user-friendliness and flexibility. The thermostat features a built-in startup guide and menu options in English, Norwegian, and Swedish, making installation simple and intuitive.
You can choose whether to use the thermostat standalone, with Bluetooth Mesh, or with Zigbee 3.0 for integration into smart home systems. It can be controlled via the Namron Simplify app or integrated with Athom Homey for advanced functionality.
With adaptive heating, the thermostat ensures your floor is always warm when you want it. It includes a weekly schedule, modes that match the Simplify system, as well as frost protection and a curing function. The thermostat supports connections for a floor sensor and an external sensor, and can operate as either a thermostat or a regulator. In addition, floor protection ensures safe and efficient operation.
Specifications
- Operating voltage
- 220-240V 50/60Hz
- Operating temperature
- 5 to 40 °C
- Relative humidity
- ≤80%
- IP Degree
- IP21
- Measurments
- Front panel: 56x56x18,5 mm
- With backplate: 70x70x43mm
- Building depth: 24,5mm
- Load
- Single-pole break
- Resistive load: 3600W
- Installation
- Mounted in standard wall box
- 55*55 faceplates
- Protection
- Short circuit protection
- Overload protection
- Overtempterature protection
- Protocol and Radio Frequency
- Bluetooth 2.4GHz (IEEE 802.15.4)
- Zigbee 3.0 2.4 GHz (IEEE 802.15.4)
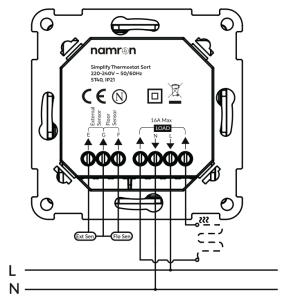
Wiring diagram
Wiring
Security warning!
Before installation, switch off the mains power. The device must remain disconnected from the mains at all times during the installation process.
Before restoring power, ensure that the front panel is properly installed on the main control unit. This device is not an SELV (Safety Extra-Low Voltage) product; therefore, all internal components must be consideredas operating at 230V AC.
Interface
External switches can be connected to inputs S1, S2, and P. Only momentary (spring-return) switches are supported.
Main screen interface
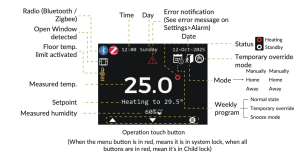
- Operation
- Menu navigation
- Press the menu icon to enter operating mode (Manual, Home, Away, Sleep, Holiday). Press the right button to open the settings menu. Use ▲ / ▼ to scroll through options (selected item is highlighted). Short press to enter; press and hold (1 sec) to go back.
- Editing settings
- Press the right button (Confirm) to edit (value flashes). Adjust values with ▲ / ▼ (short or long press). If no action is taken within 10 seconds, changes are discarded.
- Shortcuts
- When enabled, Curing Mode and Snooze appear in Settings for quick access.
- Menu navigation
Thermostat settings
| Function | Menu path | Operation |
|---|---|---|
| Sensor type | Settings –> Thermostat settings -> Sensor type -> | Select type of sensor for Floor or External input: No sensor, Namron, Other Brand or Maual select |
| Thermostat control mode | Settings –> Thermostat settings -> Control mode -> | Control mode: Select Thermostat or Power regulator Sensor Mode: Select which sensor the thermostat should use for temperature control (Only available if a sensor is configured, else air sensor is used) |
| Floor Temperature limit – Limits floor temperature for protection. Only available when floor sensor is connected and configured | Settings -> Thermostat settings -> Floor limit -> | Select between following options: Wood: 27°C Stone: 35°C Custom: 25-40°C |
| Advanced Thermostat settings | Settings –> Thermostat settings -> Advanced Thermostat settings -> | Hysteresis: 0,5-5°C Temperature Calibration: ±10°C Temperature lower limit: 5-39,5°C Temperature Upper limit: 5,5-40°C Frost: Standard is 7°C Curing time: Input curing period Adaptive heating: Yes/No Open Window Function: Yes/No |
| Screen settings | Settings –> Screen settings | Backlight: Active backlight brightness & Idle backlight brightness Screen on time: Time screen is active Active display elements: Select elements shown on a active screen Idle display elements: Select elements shown on idle screen Theme: Light or Dark theme Language: English, Norwegian or Swedish |
| Time setting | Settings -> Time settings | Date: Set data Time: Set time Date Mode: Set date format Schedule: Set heating schedule Auto sync time: Automatically sync time from the Simplify app or gateway |
| Power On/Off | Power Off: Settings -> Shutdown | Power Off: Select Yes, screen turns off after 5 seconds (Dim if Frost protection is active Power On: Hold any button for 5 sec |
| Factory reset | Settings -> Advanced -> Factory reset | Select Yes. Device reset and restarts with Startup guide |
| Select a Operation mode | Press menu | Select operating mode from list and press select |
| Operation mode temperature settings | Settings -> Thermostat settings -> Mode temperature settings | Select mode to edit and adjust temperature with arrow keys |
| System lock / Child lock | Settings –> Advanced settings – > Lock | System lock: Blocks menu – PIN required Child lock: disables buttons – Hold menu button for 5 sec for temp disable |
| PIN – Used with System lock | Settings -> Advanced settings -> PIN | Factory code: 0000 Set wanted PIN Code If you forget PIN code, power cycle device and enter menu before lock. |
Network settings
| Function | Menu path | Operation |
|---|---|---|
| Network Inclution – Bluetooth and Zigbee | Settings -> Network settings | Select Zigbee or Bluetooth to include – Only one protocol can be active at once. Activating one will disable the orher |
| Network Exclution/Reset – Bluetooth and Zigbee | Settings -> Network settings | Select Zigbee or Bluetooth to reset |
| Manual OTA – Over the air update | Settings –> Network settings -> Bluetooth OTA Pair | Select Bluetooth OTA Pair to activate OTA Mode on thermostat Open the OTA menu in the Simplify app and select Manual OTA. Follow instructions |
Error codes
| Error code | Error discription |
|---|---|
| ERR1 | Zigbee error |
| ERR2 | Bluetooth error |
| ERR3 | Internal sensor error |
| ERR4 | Floor sensor error. Please check connections or replace sensor |
| ERR5 | External sensor error. Please check connections or replace sensor |
| ERR6 | Overheat error. Turn off and let thermostat cool down |
| ERR7 | Overload error. Turn off thermostat to prevent damage. Reduce the connected lead |
Troubleshooting
| Protocol | Problem | Nb | Cause and what to try |
|---|---|---|---|
| Bluetooth | Device is not found by the Simplify app | 1 | Device is in Zigbee mode. Settings -> Network settings -> Select Bluetooth to include – Only one protocol can be active at once. Activating one will disable the other |
| 2 | Reset the bluetooth pairing. Settings -> Network settings -> Select Bluetooth to reset | ||
| 3 | Factory reset of the device. Settings -> Advanced -> Factory reset -> Select Yes. Device reset and restarts with Startup guide | ||
| 4 | Perform a manual OTA firmware upgrade of the device. Settings –> Network settings -> Bluetooth OTA Pair When in Bluetooth mode select Bluetooth OTA Pair to activate OTA Mode on thermostat Open the OTA menu in the Simplify app and select Manual OTA. Follow instructions | ||
| Bluetooth | Device not responding in app | 1 | If the Simplify app has been closed on your device, or if there is a long times since last use you may experience that the device is not responding. Please give the app 10-60 seconds to reconnect to the Bluetooth Mesh. |
| Zigbee | Device is not found by the smart home gateway | 1 | Device is in Bluetooth mode. Settings -> Network settings -> Select Zigbee to include – Only one protocol can be active at once. Activating one will disable the other |
| 2 | Reset the zigbee pairing. Settings -> Network settings -> Select Bluetooth to reset | ||
| 3 | Factory reset of the device. Settings -> Advanced -> Factory reset -> Select Yes. Device reset and restarts with Startup guide | ||
| 4 | Perform a manual OTA firmware upgrade of the device. Settings –> Network settings -> Bluetooth OTA Pair When in Zigbee mode select Bluetooth OTA Pair to activate OTA Mode on thermostat Open the OTA menu in the Simplify app and select Manual OTA. Follow instructions |